
Stop GTM Tags firing by User-Agent
One of several tools I use regularly when setting up Analytics and Tag Manager for clients is to configure my browser user-agent and use it to control when or if tags fire for me.
This technique can be used as a simple include/exclude switch for debugging. Effectively stops Google Tag Manager firing Tags that would otherwise record internal or QA traffic in Google Analytics.
I’ve recommended the User Agent Switcher for Chrome plugin in Facebook groups and Slack chats as a solution to selectively blocking Tag Manager from firing tags several times.
But then I’ve been asked how I use it for blocking internal traffic and indeed why this option over other approaches. I understand if its not an approach you’ve considered, it might be a little abstract how the ability to switch your user-agent would help, or when it could be useful.
So I thought it might be useful to go into more detail on a blog post.
Why would you need to block Tags?
Simply put – when you don’t (yet) want to send data to Google Analytics, Facebook, AdWords, LinkedIn etc. you need to block Tag Manager from firing those tags.
Either they aren’t set up correctly yet or they are set up and published, but you don’t want to track yourself in reports.
So, during Setup for Google Analytics and Tag Manager, how can you:
- Stop Tags: events, page views, conversion, Facebook pixels firing before you want them to?
- Block internal and QA traffic from reporting to an existing Google Analytics property?
- Still see data to check if its correctly reporting what you set up?
There are several techniques to block yourself from being tracked in Google Analytics. There are other options for blocking Tags from firing in Google Tag Manager when debugging, and these approaches can be combined.
This is just one tool in the toolbox, I’ll cover some other approaches and workflows in other posts.
In this example scenario I want to fire all the tags that I am setting up, so I can check they work as intended. But I also don’t want that QA and setup activity reporting in the main Analytics property. And, when it does go live, I only want it firing for actual users (and maybe clever bots), but not me.
Using Google Tag Manager to control Tags
Firstly I am not so much making the assumption, but starting with the strong recommendation – if you aren’t using Google Tag Manager then you should plan to make the move as soon as possible.
It makes the process of setting up most tracking and tags much easier, as well as simplifying a bunch of features and options in Google Analytics which, whilst possible with hard-coded script, are harder to set up and maintain.
If you haven’t already migrated to Google Tag Manager (why?) then some of the tips and tool will help, but you’ll need to pick out the bits that apply to your scenario. This guide assumes you are using Google Tag Manager already.
Install User-Agent Switcher for Chrome
Once you have (or if you have already) got GTM in place on all pages you can begin. For Chrome users install the plugin
There are lots out there but this one is built by Google and is reliable and easy to use. Whichever you choose you need one that will allow you to edit the navigator.userAgent value.
You also need to be a little careful – there have been plugins to do this which have been compromised or contain malicious code. So I’m recommending the Google one, if you choose another, your mileage may vary
Set up the User-Agent Switcher in Chrome
Go to Options
Right click to access the Options

Create a new Custom User-Agent

- Give it a name
- Whatever will make it clear to you what string you are selecting
- Add a text string to use for the user agent
- Tip: start with a _ (underscore) as an identifier for where it starts in the string
- Add to the Chrome Group
- Assuming its Chrome you are spoofing
- Choose Append as the option
- Set Indicator Flag to Y for true
- This sets it so you can see when the switched agent is enabled
- Click Add to save the new User-Agent
Optional – change settings to suit your requirements

Defaults should work for most situations, but you may want to set a per-tab limitation
For this example, you don’t want to select the “Do not spoof JavaScript objects” option
Because that’s precisely what we’ll be using it for in the next step.
We will be setting up Tag Manager to block Tag firing when the user agent we just created is matched. And Google Tag Manager references the JavaScript object – so we do want to spoof this for JS Objects.
Create a GTM variable for the User-Agent
In your GTM container
- Navigate to Variables
- Click to create a new User-defined Variable
- Name it jv – userAgent
- Select type of JavaScript Variable
- Enter navigator.userAgent
- Save

Create Triggers in Tag Manager
Create a Blocking Trigger with the User-Agent variable
- Navigate to Triggers
- Create New Trigger
- Select Pageview
- Change Toggle to Some Pageviews
- Pick User Agent from the variable list
- Select “contains”
- Regular Expression (regex) if you want to be more exact
- Enter _debugmode in the value field
- Regex of .*_debugmode$ would also work
- or whatever you chose to append as your debug agent label
- Save

This provides a Trigger Exception to stop GTM Firing Tags
Create a Sandbox Trigger with the User-Agent variable
However, in this scenario we want the tags to fire for setup and QA.
Therefore we need to use another trigger to help during testing.
In addition to a trigger exception to stop Tag Manager firing Tags that we don’t want to fire, we also need a trigger which does fire when we want to QA. This second trigger ONLY fires when the user-agent meets these conditions and, when used, will send data only into the Sandbox Property for Google Analytics
For this you can’t add just the User-Agent Trigger on its own. Multiple separate triggers added to Tags are set to an OR condition. If you set this to fire on Pageview OR userAgent = debug then either of those would fire the tag.
You need both conditions in the same Trigger – it requires AND for this to be effective.
You need to create a “Fire only on Sandbox” version of Pageview trigger. Repeat this for any other triggers which you want to only fire when testing.
Some triggers may already have some existing “Some” criteria and you want everything else to match. Therefore it is often easier to copy the existing trigger and add this additional user-agent criteria.
In this example we are only changing the Pageview trigger. For this particular use case it would be just as simple to create this from scratch. I’m just showing this as an example of the copy method.
- Click on the Pageview – All Pages trigger
- Copy the Trigger
- Rename the Trigger to Pageview – All Staging Pages
- Change Toggle from All to Some Pageviews
- Pick User Agent from the variable list
- Select “contains”
- Again Regex of .*_debugmode$ would also work
- Enter _debugmode in the value field (or whatever you chose to append as your debug label)
- In this case I’m also regex matching against a number of debug options
- Save

This will now only match if:
- User-Agent is _debugmode (or one of my other matches in this case)
AND
- the hostname for the pageview matches the staging hostname.
This provides a Trigger for GTM to fire Tags only for Sandbox
Or to put it another way it will
- Never fire on the main site – both parts of the trigger rule will fail to match
- Not fire on Staging site for any User-Agents NOT matching _debugmode
- Always fire on the Staging site for User-Agents matching _debugmode
This lets us fire unfinished tags so we can run QA on them.
But stops any developer (or other internal visitor to Staging site) firing into Sandbox.
If we weren’t working with a Staging URL simply set Page Hostname mapping to your equivalent of ^www\.trsdigital\.com.*
Unless I instruct them to also edit their user-agent it will stop Tag Manager firing tags that have this rule for any other users. This will trigger for only one person – me. Which, right now, is exactly what I want.
This would still block GTM firing any unfinished Tags on the main Property, as the rule requiring the user-agent would still match. And any existing tags which do not have this block, would continue to work as usual.
Configure GA Settings for Sandbox
For this scenario I want to be firing the Tag that is being setup into a separate Property in Google Analytics so I can QA the tag. And I want to block GTM firing Tags into the Main Reporting Property whilst in Preview mode.
I have now set up Triggers, which will control this.
What I need next is a Google Analytics Property to send the test data into.
Set up a Sandbox Property in Analytics
If you don’t already have a Sandbox Property for your site then you need to set one up

- Open your Google Analytics account
- Go to Admin
- Click the Create Property button
You can have a maximum of 50 Properties for an Account so unless you are really pushing the limits of a free account or have not set up your Account > Property > View structure sensibly then there’s really no reason NOT to always have a Sandbox property.
Indeed in client engagements it’s usually one of the first things I will do. That way I have a Sandbox environment where I can check the data being sent in any setup changes, without impacting their existing reporting. At least not until I am ready to roll out the improvements and additions.

You don’t need the code snippet provided when you are planning to deploy through GTM. Just get the new Tracking ID and configure the Property for use as your Sandbox.
Depending on what you plan to change you may want to slavishly copy the Main View setup, custom dimensions, channels, events, goals to match the new Sandbox 1:1 with the existing Property before you start to add to it.
Or you might not want to copy anything from an existing mess and only report your new Tags into a completely clean Property to reduce noise. In that case just leave this Sandbox on the basic settings and configure only the parts you need for the adjustments, corrections, additions and testing you’ll be working on for this deployment. That’s a topic for another day
Create a New GA Settings Variable
So now you should have two Property IDs for example
- UA-12345678-1
- UA-12345678-2
If you are already using Google Tag Manager to fire Tags for the main Property you are probably also using the GA Settings option
And the simplest way to set up a new one is to Copy the existing one and rename it
- Navigate to Variables
- Open GA Settings for your main Tag
- Copy Tag
- Rename to GA – Sandbox
- Change the UA ID to your version of UA-12345678-2
- Save
You now have two GA Settings Variables to choose from:
- UA-12345678-1 for the GA – Main
- UA-12345678-2 for the GA – Sandbox
These can now be used for the appropriate Tags and Triggers – block GTM firing tags with the GA – Main settings when on Sandbox, fire tags with GA – Sandbox settings when testing on Sandbox
Edit Tags to use the Triggers
Edit Main Property Tags to use the Blocking Trigger
- Navigate to Tags
- Select a Tag which you want to block from firing whilst debugging
- Leave the Existing Firing Trigger for All Pages
- Add your zz userAgent – debugmode as a Blocking Trigger in Exceptions
- Save
Repeat for all Tags you want to block from firing during debugging
Now your Pageview (and any Events, Timing, Facebook, LinkedIn etc tags) will fire for everyone as usual except if user-agent contains _debugmode.
Which currently is short list of one person: you.
And this will apply whether you are in Preview mode or simply browsing the site (as long as you don’t change your user-agent back to default).
And if you did want to quickly re-enable tracking, for checks on live it will be a simple click on the User-Agent Switcher plugin to change back to Default user-agent. You don’t need to go into every tag and change the “Fire only on Debug” option on and off.
And yes you can create a version of the All Pages firing trigger with a second condition of except if user-agent contains _debugmode. However I find it easier to spot the exceptions when they are listed separately in the tag list, rather than customising the main Do Fire on Main trigger.
Edit Sandbox Property Tags to use Pageview + debug Trigger
- Staying in Tags
- Select a Tag which you only want to fire whilst Debugging
- Change GA Settings variable to the Sandbox Property version
- Add your Pageview is Debug to the Firing trigger
- If you copied the Tag from a Live version make sure:
- You remove the Pageview All Pages or other Firing trigger
- The GA Settings is changed to the Sandbox Property
You now have
- a container that will not fire your new tag that you are testing for any user without _debugmode
- a container that will not fire existing tags whilst you are testing.
GTM Built-in settings
Now at this stage you could rightly point out that Tag Manager has a couple of options to Fire or Not Fire any tags in Debug mode.
And this is correct – the “Only fire in Published containers” option in Advanced Settings on a Tag achieves a similar outcome.

But it only applies when you are in Preview mode or on a Debug setting.
Plus as per the help text, it can sometimes not work as expected.
The “Use debug version” applies to GA Settings rather than per tag and has similar functionality and limitations

This however can accept a GTM variable as an argument, not just True or False. Which in some situations has advantages you can use, notably changing which settings are used for a Tag depending on the lookup or conditions of the variable.
There is the option to set up for a testing Environment and use a hostname lookup to appropriately switch between the Main Property Settings and the Staging or Sandbox Settings. So instead of a True False hard-coded choice, a domain or “is development” rule can be used in a lookup, and the result of that lookup can be used as the variable for Use Debug Version True/False.
Whilst this is a useful tool it is less flexible and, in the process of running through a QA where the site is not in a dev environment but the Tag being set up is in development, this would require you to edit each Tag to toggle this option, then Refresh the container, then Refresh the page. And back again to reverse
Which can be time-consuming
So these options are more suited to a staged deployment and is a more global switch once you have checked functionality and want to ensure each is fired in the appropriate situation.
I’ll maybe look at those options in a little more detail on another post about Workflow, but that is outside the scope planned for this walk-through.
But during set up testing, the user-agent switch technique can be used for more fine-tuned include or exclude of tags and easily switching between Fire/Don’t Fire cases.
With this simple user-Agent switch and fire over Fire/Don’t fire the container can be tested Tag at a Time, and you can swap between the states much more quickly.
With the rules set to Trigger as outlined, this also means you have a No-Harm state – this could safely be published leaving these rules in place. And you would remain blocked on main Property, unfinished tags would only send to Sandbox, as long as you kept the user-agent string switched to meet the blocking exception.
So even if your use case requires and uses the more global switches, this option is still a useful addition, even if it is belt and braces in your particular scenario
Check it works
With that digression covered, and with these changes made to the GTM set up you can now test that it works as intended.
- Refresh the Preview and refresh the page on which you are testing
- Change the user agent to Debug
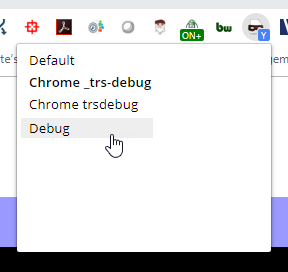
- In the toolbar left-click the icon and pick the user-agent Group
- Click the expand option and pick the Debug appended user-agent
- The page will reload automatically

You now qualify for the triggers you set up for your tags. If you set the Indicator flag option when you set it up you’ll see a Y on the icon to indicate when the user agent is switched
At this stage you’ve changed nothing, the browser is still identified as Chrome but the user agent now simply has _debugmode appended to the end of the user string
Our userAgent now matches the Trigger conditions we have set up for the Tags: it “contains” _debugmode.
Therefore, only Tags which use the Trigger All Pages on Staging hostname AND _debugmode will fire.
Existing Tags for the Main Property have an Exception of _debugmode and will not fire on their All Pages tag.
Which you can now test in Preview mode
Going Live
Once thoroughly tested and data checked in Preview you can Publish the new tags. Again some choices depending on what you need to achieve
Change your Sandbox Tag to be the new Live Tag
Reverse the trigger rules and change the name to reflect this change
Remove or Pause the current Live Tag
The new, improved and thoroughly tested version is now the Live tag
Or
Copy across the changes made on the Sandbox Tag to the Live Tag
The Live tag now has the adjustments you tested
The Sandbox version can now be Paused or further changes set up
This second approach then has the correct Trigger and Exception already set.
- It won’t fire for you with _debugmode enabled
- It will fire for anyone without _debugmode
Note: This would include you – firing into the main Property – if you change back to Default user agent, once finished with testing set up.
If you switch back to Default user agent any and all tags on the Published version would fire as if you were a normal user, because for all intents and purposes at that point, you are.
Which is why in the screengrabs you see I have alternative versions, ones which I typically always leave enabled in Chrome
Once I am done debugging and the updated GTM is ready to Publish, I change to a separate set of blocking triggers which meet a condition that is true for me at all times so I’m never tracked on the main account unless I want to be.
This is then something I add to all my client’s containers, so if I visit their site in normal usage, not in Preview mode, I will still be blocked from any Live user tracking and won’t pollute the main reporting Property and views
Yes, I could set up IP filters to exclude my traffic. But I am frequently on a VPN, travelling away from home IP and indeed my home IP itself changes regularly
So IP exclusion within Google Analytics filters is not fool proof, without a lot of additional administration to keep this updated, this acts as a catchall block and the only risk is I will show an odd variant of the Chrome user-agent string if anyone is looking too deeply in their log files or analytics
Obviously where there is Tag Manager there is a Simo Ahava post covering this, so for an alternative semi-permanent approach to blocking internal traffic from Google Analytics day to day reporting.
If that is what you need, I recommend you read his explanation of how to do this with custom ?internal=true parameters. There are other options including dedicated browser plugins like DaVinci Tools for Chrome, rewrites or VPN identification.
My method is not an approach for all internal users at all times, its a workaround when there is a need for back-and-forth switching, which you need to do more frequently when configuring accounts and new tags.
User Agent switching without a plugin
If you can’t or would prefer not to install a plugin then in most cases you can change your browser settings manually to achieve the same effect.
For Chrome there is a user-agent switcher built into Developer tools
To access this
Click Menu > More Tools > Developer Tools
Alternatively press CTRL+SHIFT+i on your keyboard

To do this you’ll need to edit a value in the Console. If you don’t see Console click the menu in the top right of Developer Tools (vertical dots just left of the “x” to close) and select Show Console

When Console is visible – click the Menu button of the Console tab
Vertical dots just left of the tab then select Network conditions tab

Uncheck “Select Automatically” for User-Agent

We don’t want Custom (yet)
Select Windows Chrome or Mac Chrome as appropriate
Copy the string that is shown to get the correct current user-agent string

Change to Custom…
Paste the string you just copied
add “_debugmode” (without the quotes) to the end of this string

This effectively does the same as the plugin I just walked you through.
However there are a couple of limitations which make this less convenient if you need to do this regularly
- It affects only the current tab
- It only applies whilst Developer tools is open
So not only is that approach slower, its not permanent so needs to be repeated and would not provide the same catchall blocking benefit
User Agent switching with another browser
If are using another browser then there are plugins for most of them and as with Chrome you can change this in developer settings for each session
This is an easy to follow user agent switching guide for the main browsers
However, as GTM preview works most reliably in Chrome that’s what I tend to use for debugging most scenarios.
Whilst you can do this within Chrome settings for a session, I find the toggle switch of the plugin easier in day to day when I am testing tag additions and alterations but need to swap between firing and not firing them.